Welcome to the SpriteMan 3D User Guide! |
Thank you for your interest in SpriteMan 3D! SpriteMan 3D is a 3rd party asset for the Unity game engine that enables you to create multidirectional sprite characters in 3D games. There are many examples in gaming history that use this technique. With SpriteMan 3D and Unity, it is easier than ever to give your games that same stylistic feel!
This document describes how to use the SpriteMan 3D component. Here’s a brief description of the workflow.
RIG - First, hook up spritesheets to a multi-directional sprite model.
ANIMATE - Second, connect sprite model animation states to Unity’s Mecanim system.
CONTROL - Third, drive your models with player or AI controllers.
SpriteMan 3D consists of following parts:
A Sprite Manager component gets placed on Sprite GameObjects.
 Important
A managed sprite MUST be a child of a parent GameObject. The Sprite Manager component requires control of the Sprite’s rotation to achieve the correct effects. You will not be able to modify the Sprite’s rotation as long as the Sprite Manager is enabled. You can control your model’s movement and rotation through the parent GameObject. You can disable and enable the Sprite Manager component the same as most other components.
The Sprite Manager allows adding, editing and deleting States for your managed sprite model.
Editing a State is done with the State Editor. This window appears when you click Edit for a state in the Sprite Manager component.
You can see a live preview of your characters in the Scene View.
SpriteMan also comes with a suite of tools to make managing hundreds of sprites easy.
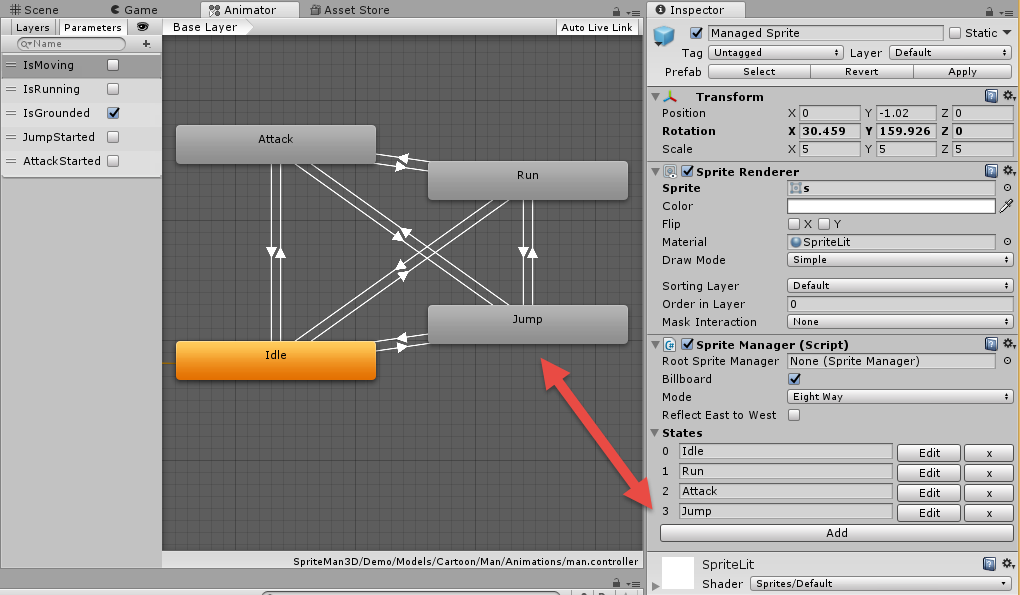
The Sprite Manager component exposes the following fields to the Inspector. (You can see the Sprite Manager class too).
- Root Sprite Manager
Specifies the sprite manager that is root of this sprite manager.
SpriteMan now allows creating hierarchies of managed sprites. Ex: a body with clothing sprites above it. The body would be the root and should have this field left empty. Clothing sprites would use the body as the root (and have billboard unchecked).
- Billboard
Billboards this sprite when checked. This should be unchecked for children when used in a hierarchy (ex: clothes of a character).
ImportantIt's recommended to set this to false and use the SpriteMan3D Billboarder component instead. It has billboarding customization options.
- Mode
Specifies the DirectionMode to use for a Sprite Manager. Valid values are Two Way, Four Way, Eight Way and Sixteen Way. To understand directions better see Direction Mode and Cardinal Directions.
CautionChanging the Mode deletes existing state frames and replaces them with empty values. If you've configured a model and you do this by mistake, you can undo the change using Ctrl-Z. It’s also recommended you create prefabs for the models you’re working on that you can revert to.
- Reflection Mode
Use this to reflect east/west directions. Select the reflection option (None, East to West, West to East). Leave all opposite directions empty in the State Editor. (Ex: set to East to West and leave all West directions empty.) Using this option allows you to reduce your sprite atlas sizes and amount of sprites to create.
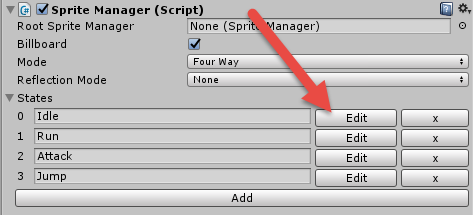
- States
Specifies different states for your model, like Idle, Run, Attack.
Name - Allows setting a name for you state.
ImportantThe corresponding Animation State you configure in this model’s Mecanim Animator must have the same name!
Add - Adds a new state to your model
Edit - Opens the State Editor and points it to the state you’re editing
X - Removes the given states from your model
 Note
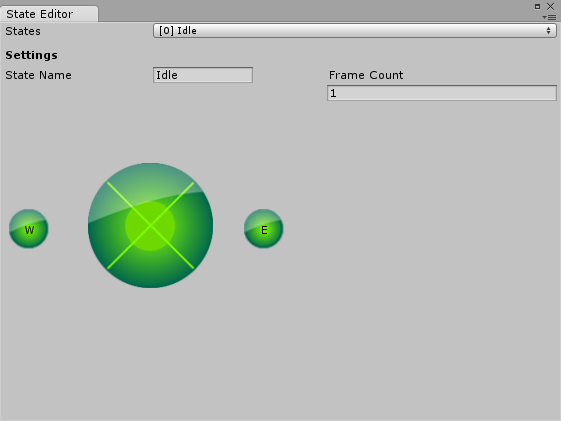
NoteWhen clicking Edit, the State Editor will display a different amount of editable directions based on the Sprite Manager's Mode.
Two Way
East (E), West (W)
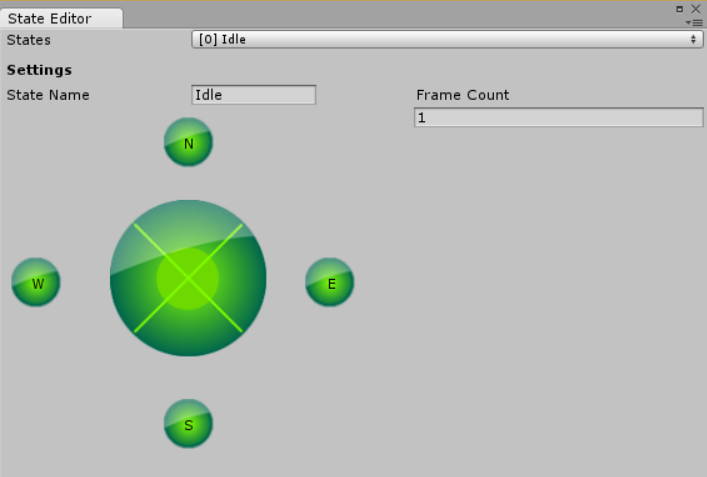
Four Way
North (N), East (E), South (S), West (W)
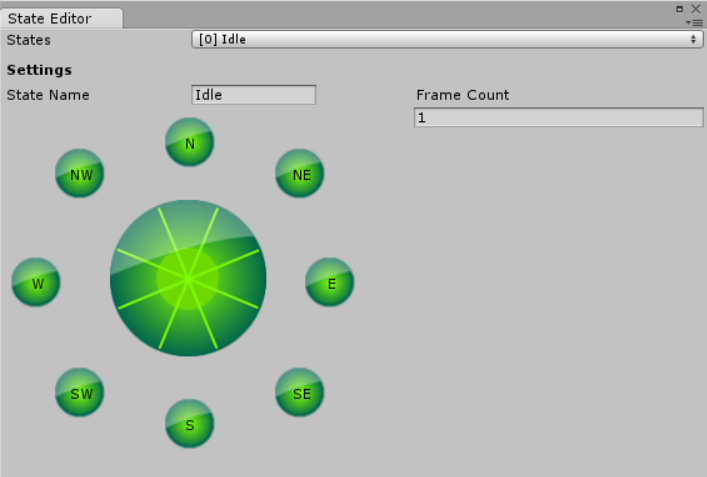
Eight Way
North (N), Northeast (NE), East (E), Southeast (SE), South (S), Southwest (SW), West (W), Northwest (NW)
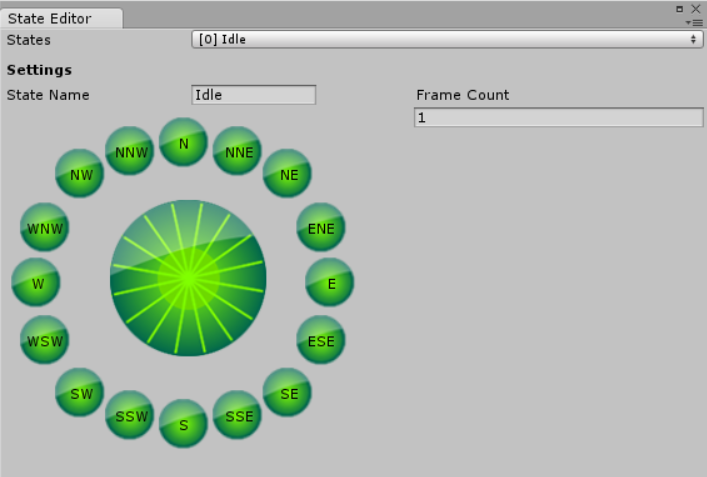
Sixteen Way
North (N), North-northeast (NNE), Northeast (NE), East-northeast (ENE), East (E), East-southeast (ESE), Southeast (SE), South-southeast (SSE), South (S), South-southwest (SSW), Southwest (SW), West-southwest (WSW), West (W), West-northwest (WNW), Northwest (NW), North-northwest (NNW)
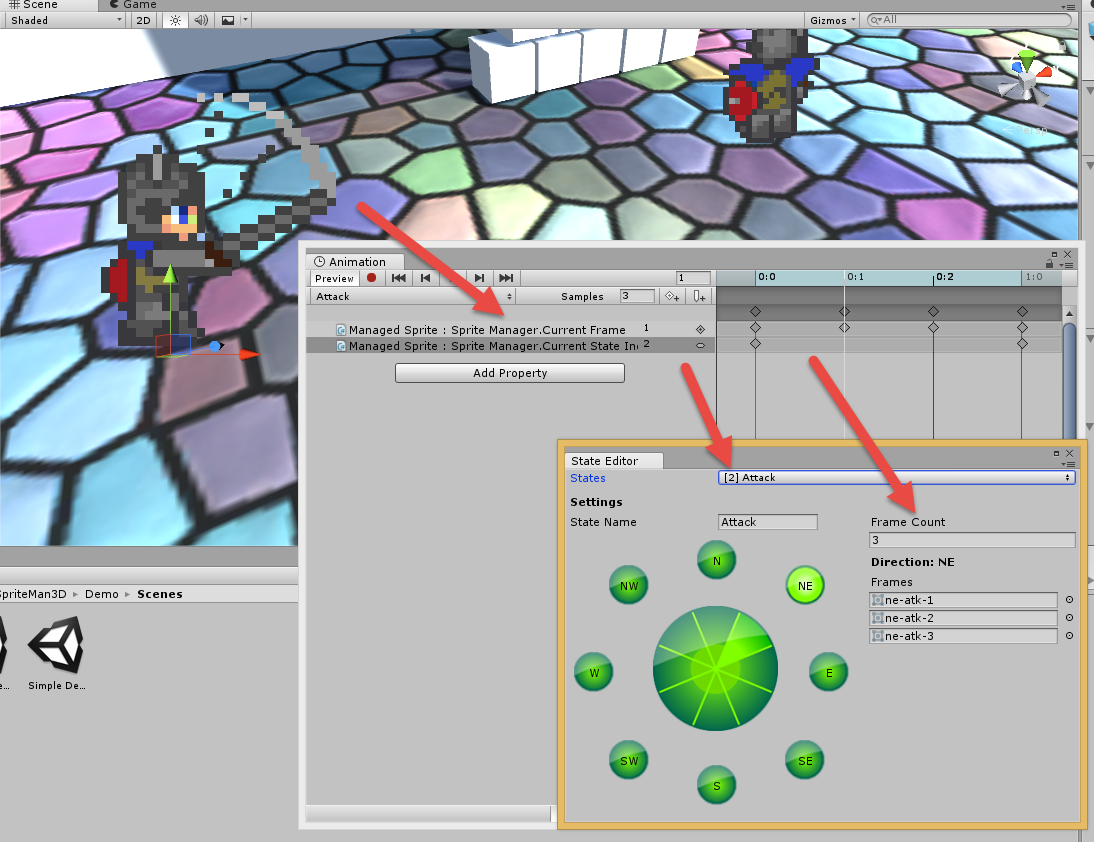
The State Editor appears when you click the Edit button of a Sprite Manager’s State component in the Inspector.
These are the sections and fields available in the State Editor.
- States
This is a dropdown that lets you select the State to edit
- State Name
The name of the state - the same as shown in the Sprite Manager Inspector
- Direction Wheel
Allows changing the frames of animation for each direction of a state.
- Frame Count
The number of animation frames your state contains.
- Frames
the individual frames for a state direction - you assign your sprites here.
The cardinal directions used in this component don’t represent real geographic directions, but rather a model’s orientation to a camera. Though, the simplest way to think about it is this: imagine you’re playing a top-down adventure or RPG game where a camera orientation remains fixed.
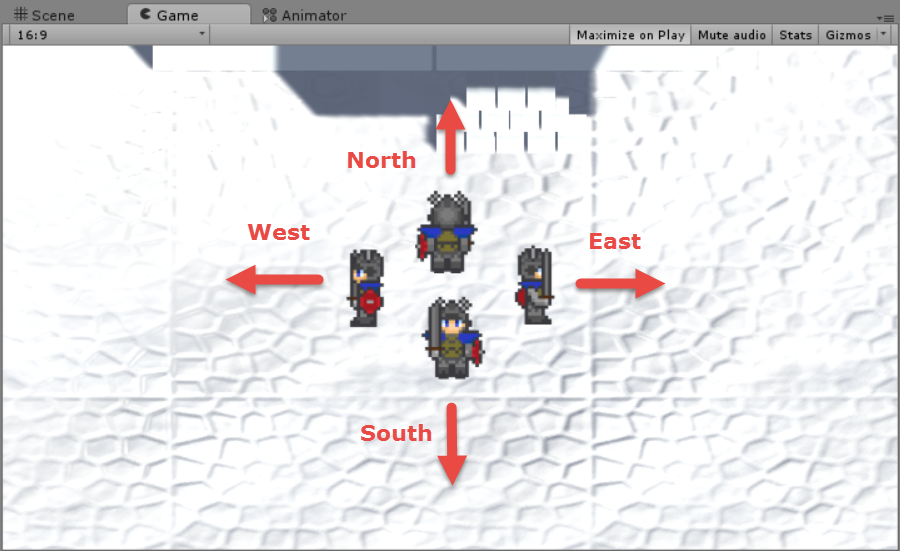
North: a character walking North heads away from the camera.
East: a character walking East heads right.
South: a character walking South heads towards the camera.
West: a character walking West heads left.
The same principles apply to the intermediate directions.
These principles will apply to other camera configurations you may wish to set up in your game. You don’t have to do anything extra, but it may help to understand these perspectives. With modern games, you may choose to allow camera angles to change. So, remember what was stated above. North means pointing AWAY from the camera. South means pointing TOWARD the camera.
When you’re rigging a managed sprite model, it’s easiest to imagine you’re making a top-down adventure or RPG game to set up your models. The rest is handled by the Sprite Manager component. |
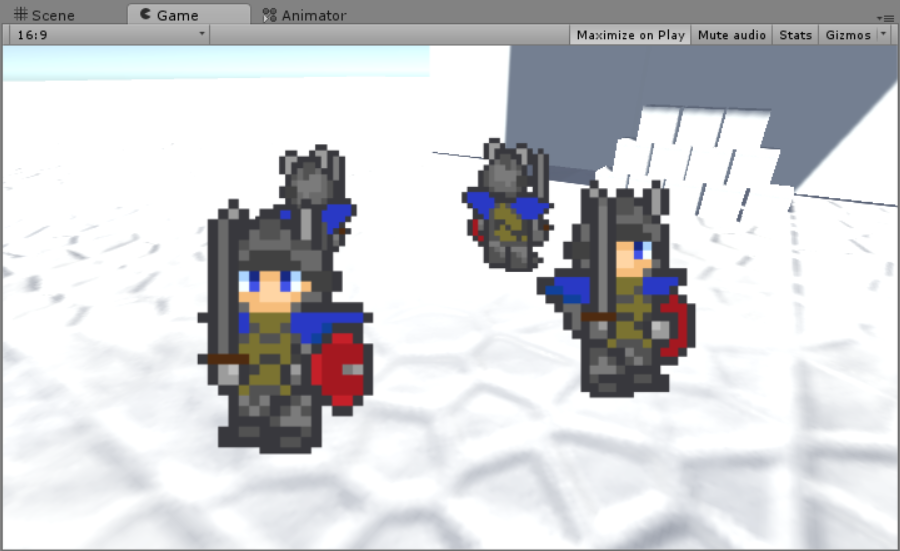
Then there are also games where you may want to have multiple cameras and viewports. SpriteMan 3D supports this and all the same camera viewing principles apply.
Prepping sprites and spritesheets
You’ll need sprites, spritesheets or sprite atlases to hook up to your Sprite Manager. The Sprite Manager component supports any of these - ultimately, you’re assigning Sprites to directional animation frames, regardless of where they come from.
When you import your sprites and spritesheets into Unity, make sure to set the import setting as Sprite.
|
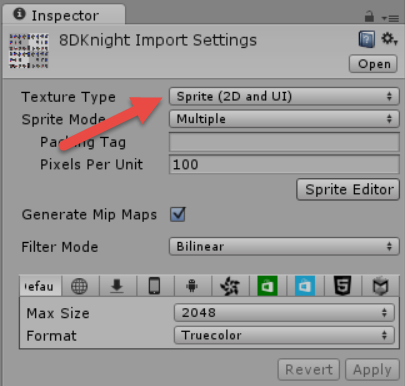
You can use sprite textures of any size, but it’s best to create sprites and spritesheets that are power of two in size. Look at Unity’s section on power of two textures. And, check out these useful links for more information: |
Rigging a Sprite Manager
The next sections describe how to rig a Sprite Manager using your sprite assets.
Starting from SpriteMan 3D prefabs
The SpriteMan 3D plugin comes with a few stock rigged prefabs to help you create your own managed sprites more easily.
Find these prefabs in your Project pane under Assets\SpriteMan3D\Prefabs
Drag a prefab to your scene
Default 3D Sprite - this is a managed sprite prefab with a single Idle state and no Animator. This prefab is good for stationary prefabs or a good starting point for your own custom managed sprites models.
Person 3D Sprite - this is a managed sprite prefab of a knight rigged with a few simple states: Idle, Run, Jump and Attack. This prefab can also be a good starting point for customization with more complex actions.
In the Hierarchy Inspector, select the child Sprite of your new model and customize the SpriteManager component.
After customizing, create a new prefab by draging this new model to a desired location in the Project view.
Starting from scratch
It’s also easy to create new managed sprite models from scratch. Here's how:
Create an Empty GameObject
Create a child Sprite GameObject and rename it to ManagedSprite
NoteYour child Sprite doesn't require a specific name. We recommend the name ManagedSprite for clarity.
Add a SpriteManager component to the Sprite GameObject
Configuring a Sprite Manager component
Choose a Mode for your model: Two Way, Four Way, Eight Way, or Sixteen Way.
CautionChanging the Mode deletes existing state frames and replaces them with empty values. If you've already configured a model and you do this by mistake, you can undo the change using Ctrl-Z. It’s also recommended you create prefabs for the models you’re working on that you can revert to.
Add and name the States you wish your model to have.
Edit your states using the State Editor
Once you’ve created a new managed sprite model as described in the Rigging section, the next step is to animate it using Unity’s Mecanim system.
Starting from SpriteMan 3D prefabs
To describe how to create new Animation states, take a look at the prefabs and Animator that come with our package. The Default 3D Sprite prefab doesn’t have an animator, so you’ll have to start from a Person 3D Sprite.
Look at the parent GameObject and find its Animator component.
Open the Animator on the parent GameObject.
Compare the states in the Animator with the states on the SpriteManager of your model (this is on the child Sprite). You’ll notice that each state found in Sprite Manager has a corresponding animation and state in the Animator. (See the Creating Animations section for more details.)
Now, select the Sprite GameObject of your model.
With the Sprite GameObject selected, open the Animation window (Window > Animation).
You will see some existing animations and notice one of the fields animated reads 'Managed Sprite : Sprite Manager.Current Frame'
What gets animated is a float field named CurrentFrame. Remember that each SpriteManager state has a Frame Count. Animating CurrentFrame just increments the frame number at the intervals you wish, and that's all you have to worry about. The SpriteManager chooses the correct viewing angle internally based on the CurrentFrame of an animation state.
You will also notice an animated field named 'Managed Sprite : Sprite Manager.Current State Index'
This corresponds to the SpriteManager State index and lets the SpriteManager component know which state to animate. This must be set for each animation.
ImportantBefore SpriteMan version 2017.1, SpriteManager would automatically detect the current state at runtime from a Sprite Animator. However, this doesn't work for live previewing animations. So this workflow has been changed. It requires an extra manual step to work, but works with both live preview and runtime animations. It also performs better than before.
Starting from scratch
We recommend that you become familiar with the previous section - Starting from SpriteMan 3D prefabs before creating your own animations and animators from scratch.
First, you'll need to create animations for you managed sprite.
Select the parent GameObject of your sprite model.
Open that Animation window (Window > Animation).
Follow what Unity says and Create a new animator and Animation clip with the Create button in the Animation window.
Name your animation Idle (make sure to save it to a folder that doesn’t already have an Idle.anim file). New animations should have the same names that are in your Sprite Manger State names.
Once your first animation is created, you’ll notice in the Inspector that an Animator component was added to your GameObject. You’ll also be able to see where it is in your Project pane.
You will be able to create new animation clips from the Animation Window.
Select your ManagedSprite again.
Drag the parent GameObject from your hierarchy to the Sprite Animator field in the Inspector. It will assign the Animator to the SpriteManager.
Now, in the Animation Window, go to the Idle animation you created.
Add an animated property for ManagedSprite : Sprite Manager.Current Frame
Add an animated property for ManagedSprite : Sprite Manager.Current State Index
Change the sample rate and create the keyframes for the current frame property and current state index.
CautionThe current state index must always be the same value for the entire animation!
Ex: say you have a Run state with 4 frames of animation per direction. The Sprite Manager reads animations so it can find frames in its states' 0 based frame arrays.
Set the sample rate to 4 and create 4 keyframes - you should have 5 total.
Set your keyframes to correspond to the frames of animation - ex: 0, 1, 2, 3, 3.
The last two keyframes will be the same number because 3 is your final index. And you want to remain on that frame for the same amount of time as the other frames.
Repeat this process to set up animations for all the other states of your managed sprite model.
Configuring Animator states
When going through this section, we recommend you use the shipped existing animator as a reference.
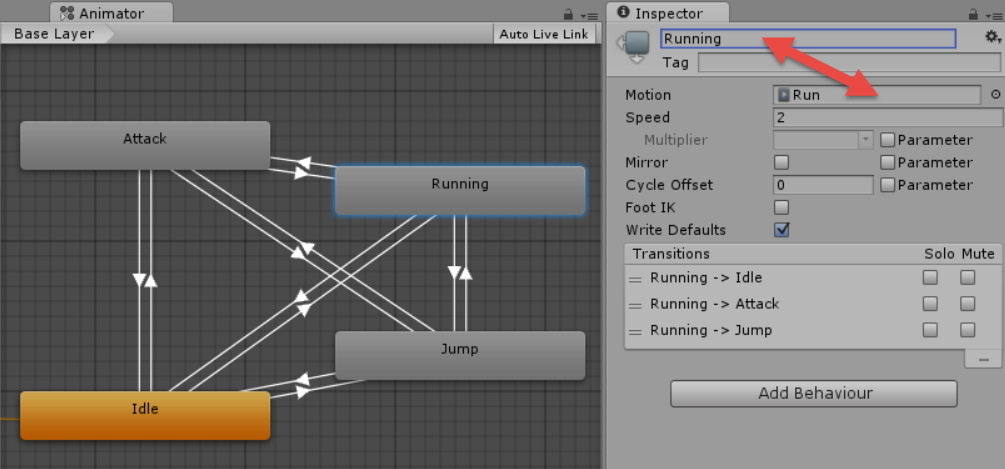
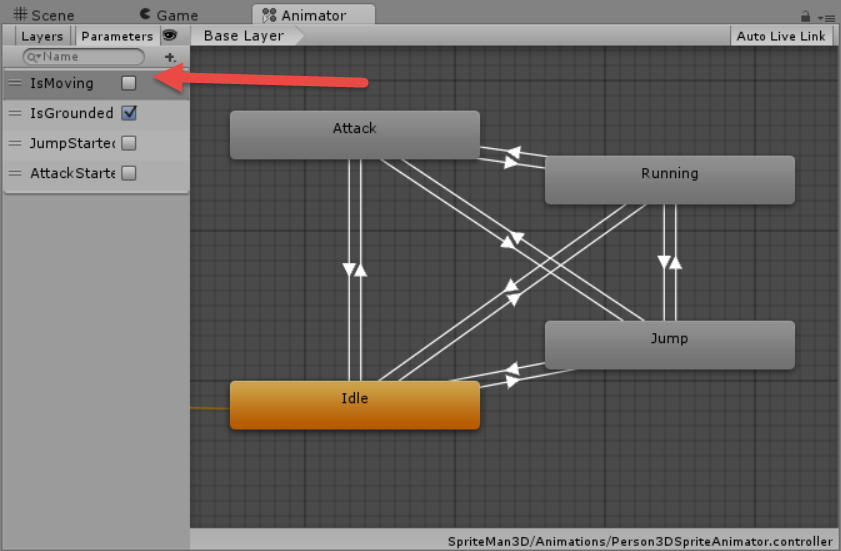
Continuing from the previous section, take a look at the Animator again - you’ll see all the animation states you created got added to it.
The Animation States you configure in your model’s Mecanim Animator should have the same name as the corresponding states in the model's Sprite Manager component to make it easy to debug.
Also, note that an animator state's name and the animation linked to it can have different names.
|
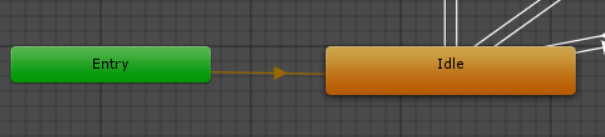
The Entry state should point to the Idle state.
Follow these conventions for configuring your states and state transitions:
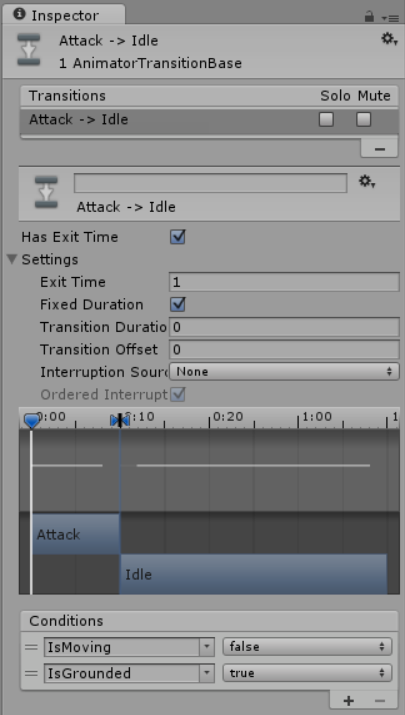
Some states get activated once per user action and don’t repeat until they’re reactivated. ex: a sword swipe. These states should have a transition back to the Idle state and/or other appropriate states. These animations should be set to not loop.
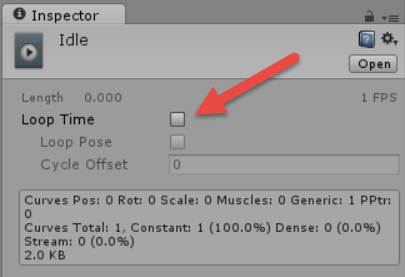
These state transitions should also have exit times of 1 - meaning they will play to the end.
check ‘has exit time’
set exit time to 1
set transition duration to 0
Some states are continuous. ex: a running motion. Animations for these states should be set to loop.
Some states don’t get triggered repeatedly, but shouldn’t transition until certain conditions are met. ex: jumping. A character performs a jump, but may be in the air for a while when jumping off a platform or a cliff.
For these transitions, you’ll want to set exit time to false and use parameter conditions instead.
If you look at the Animator provided in our package you will notice they have Parameters.
The Mecanim animation system allows you to create multiple animation layers to run multiple animations simultaneously. For more complex models, you may wish to animate additional objects, like particle systems. ex: casting a spell. Use the base layer to animate your character’s sprite animations. Use another layer to animate a particle system you add to your parent object. |
The final step is controlling your character's actions during a game. Controlling characters is usually done through player action scripts or AI scripts. In this section you will learn how to control model movement with a few scripts.
SpriteMan 3D comes packaged with some simple scripts for player input detection. These scripts are freely made available for reference and customization. We don't provide scripts for AI control. Though in either case, we assume that due to game makers' needs and the wide range of available 3rd party assets for player and AI controllers, you will most likely want to integrate SpriteMan 3D with your preferred controller assets.
Built-in scripts
SpriteMan 3D ships with a simple rig for creating humanoid characters (the Person 3D Sprite prefab). A person has these states: Idle, Move, Jump and Attack. This rig was explained in detail in previous sections.
The base class that drives this rig is PersonController. This class is simple - it is a MonoBehaviour with properties that, when set, will update the rig’s Animator. For simplicity, our whole Animator runs on boolean values described in the animator setup section.
using UnityEngine;

namespace SpriteMan3D
{
    /// <summary>
    /// The character controller used to update an Animator.
    /// </summary>
    public class PersonController : MonoBehaviour
    {
        /// <summary>
        /// The sprite manager this controller updates.
        /// </summary>
        public Animator modelAnimator;

        /// <summary>
        /// Gets or sets whether an attack started in the current frame.
        /// </summary>
        private bool attackStarted;
        public bool AttackStarted
        {
            get
            {
                return attackStarted;
            }
            set
            {
                attackStarted = value;
                modelAnimator.SetBool("AttackStarted", value);
            }
        }
        /// <summary>
        /// Gets or sets whether this character is grounded in the current frame.
        /// </summary>
        private bool isGrounded;
        public bool IsGrounded
        {
            get
            {
                return isGrounded;
            }
            set
            {
                isGrounded = value;
                modelAnimator.SetBool("IsGrounded", value);
            }
        }
        /// <summary>
        /// Gets or sets whether a character is moving in the current frame.
        /// </summary>
        private bool isMoving;
        public bool IsMoving
        {
            get
            {
                return isMoving;
            }
            set
            {
                isMoving = value;
                modelAnimator.SetBool("IsMoving", value);
            }
        }
        /// <summary>
        /// Gets or sets whether a character is running in the current frame.
        /// </summary>
        private bool isRunning;
        public bool IsRunning
        {
            get
            {
                return isRunning;
            }
            set
            {
                isRunning = value;
                modelAnimator.SetBool("IsRunning", value);
            }
        }
        /// <summary>
        /// Gets or sets whether a jump started in the current frame.
        /// </summary>
        private bool jumpStarted;
        public bool JumpStarted
        {
            get
            {
                return jumpStarted;
            }
            set
            {
                jumpStarted = value;
                modelAnimator.SetBool("JumpStarted", value);
            }
        }
    }
}
From here, we can fork to either drive our rig with player input (using a player controller), or by AI (using an AI controller).
SpriteMan 3D comes with a simple player controller: PersonPlayerController. The Person 3D Sprite prefab has this component attached. The PersonPlayerController performs the user Input detection and physics manipulation of your character.
using UnityEngine;

namespace SpriteMan3D
{
    /// <summary>
    /// A simple Input controller for detecting player actions.
    /// </summary>
    [RequireComponent(typeof(Rigidbody))]
    [RequireComponent(typeof(Collider))]
    public class PersonPlayerController : PersonController
    {
        /// <summary>
        /// A character's walking speed.
        /// </summary>
        public float walkSpeed = 2f;
        /// <summary>
        /// A character's running speed.
        /// </summary>
        public float runSpeed = 3f;
        /// <summary>
        /// A character's jump velocity.
        /// </summary>
        /// <remarks>
        /// Increase your project's Physics gravity and increase this value to make a character jump quickly.
        /// </remarks>
        public float jumpVelocity;

        /// <summary>
        /// How far to look for the distance to ground.
        /// </summary>
        public float groundDistanceOffset = 0.2f;

        /// <summary>
        /// The collider used for a mellee attack.
        /// </summary>
        public Collider attackCollider;

        /// <summary>
        /// Determines if this character can move.
        /// </summary>
        public bool canMove = true;
        /// <summary>
        /// Determines if this character can jump.
        /// </summary>
        public bool canJump = true;
        /// <summary>
        /// Determines if this character can attack.
        /// </summary>
        public bool canAttack = true;

        private Rigidbody rb;
        private float distToGround;
        private Collider charCollider;

        public float attackCooldown = 0.2f;
        private float attackTimer = 0f;

        void Start()
        {
            rb = transform.GetComponent<Rigidbody>();

            // get the distance to ground
            charCollider = GetComponent<Collider>();
            distToGround = charCollider.bounds.extents.y;
        }

        Vector3 offset;

        void Update()
        {
            IsGrounded = Physics.Raycast(transform.position, -Vector3.up, distToGround + groundDistanceOffset);

            HandleAttack();
            HandleJump();
        }

        void FixedUpdate()
        {
            HandleMove();
        }

        void HandleMove()
        {
            if (canMove)
            {
                var speed = walkSpeed;

                // detect input movement
                var moveHorizontal = Input.GetAxis("Horizontal");
                var moveVertical = Input.GetAxis("Vertical");
                IsMoving = moveHorizontal != 0 || moveVertical != 0;

                IsRunning = Input.GetKey(KeyCode.LeftShift) || Input.GetKey(KeyCode.RightShift);
                if(IsRunning)
                {
                    speed = runSpeed;
                }

                // rotate the character
                var movement = new Vector3(moveHorizontal, 0.0f, moveVertical);
                var rot = movement * (speed / 10);

                if (attackTimer <= 0 && movement != Vector3.zero)
                {
                    var newRotation = Quaternion.LookRotation(rot);
                    transform.rotation = Quaternion.RotateTowards(transform.rotation, newRotation, 10f);
                }

                // move the character
                if (IsMoving && offset.y != 0f)
                {
                    movement.y = offset.normalized.y * movement.magnitude;
                }
                movement *= (speed / 10);

                var characterMovement = transform.position + movement;
                if (attackTimer <= 0 || !IsGrounded)
                {
                    rb.MovePosition(characterMovement);
                }
            }
        }

        private void HandleJump()
        {
            if (canJump)
            {
                // detect jump
                JumpStarted = Input.GetButtonDown("Jump");

                // make the character jump
                if (JumpStarted && IsGrounded)
                {
                    var velocity = rb.velocity;
                    velocity.y = jumpVelocity;
                    rb.velocity = velocity;
                }
            }
        }

        private void HandleAttack()
        {
            if (canAttack)
            {
                if (attackTimer <= 0)
                {
                    // detect attack
                    AttackStarted = Input.GetButtonDown("Fire1");
                    if (AttackStarted)
                    {
                        attackTimer = attackCooldown;
                    }
                }
                else
                {
                    if(AttackStarted)
                    {
                        AttackStarted = false;
                    }
                    attackTimer -= Time.deltaTime;
                }
            }
        }

        /// <summary>
        /// called as animation event from Attack animation.
        /// </summary>
        public void StartAttack()
        {
            attackCollider.enabled = true;
        }

        /// <summary>
        /// called as animation event from Attack animation.
        /// </summary>
        public void EndAttack()
        {
            attackCollider.enabled = false;
        }
    }
}
SpriteMan 3D doesn’t come with any stock AI controllers since different AI packages require different setup. We leave it up to users to create integrations to their favorite AI package.
SpriteMan 3D comes with enough functionality out of the box to cover some simple use cases and help users understand how this component can benefit their game making efforts. We assume that users of this component will want create their own more complex models and controlling logic that are unique to their games. So, we strove to provide a simple and flexible component open for extension and integration with other toolsets. We recommend looking at the built in classes provided to find ways to integrate SpriteMan 3D into your workflow. Ultimately, with a SpriteManager rig and Animator set up, all you need to do is drive the Animator.
Please, feel free to contact us with any questions you may have when using our asset.
We hope you enjoy using SpriteMan 3D as much as we, it's makers, do. And with that, we wish you happy game making!